Last three posts were about consuming Rest Web services in Apex and testing the same. In this Post lets see how to setup our own services.
STEP 1: Setting up the Service and Unit testing.
For exposing any apex class as web-service we will be using the annotation @RestResource and the class should be global.
The endpoint for hitting the service will be setup by using urlMapping. See the Example below:
@RestResource(urlMapping='/Account/*')
global with sharing class MyRestResource {

    @HttpGet
    global static Account doGet() {
        RestRequest req = RestContext.request;
        RestResponse res = RestContext.response;
        String accountId = req.requestURI.substring(req.requestURI.lastIndexOf('/')+1);
        Account result = [SELECT Id, Name, Phone, Website FROM Account WHERE Id = :accountId];
        return result;
    }

}
|
The Endpoint for the above code will be: https://your salesforce org url/services/apexrest/Account/specify account id as parameter here The Test Class for the same will be:
@isTest
public class MyRestResource_Test {

    static testMethod void testDoGet() {
    account a =new account();
    a.name='Test Account';
    insert a;
    RestRequest req = new RestRequest();
    RestResponse res = new RestResponse();
    // pass the req and resp objects to the method
    req.requestURI = 'https://sirisha1-dev-ed.my.salesforce.com/services/apexrest/Account/'+a.Id
    req.httpMethod = 'GET';

    RestContext.request = req;
 RestContext.response = res;

    MyRestResource.doGet();
  }
}
|
STEP 2: Invoking the Java Service with OAuth
To facilitate authentication, we'll employ the Username-Password OAuth Authentication Flow. To initiate this process, we need to establish a connected app.
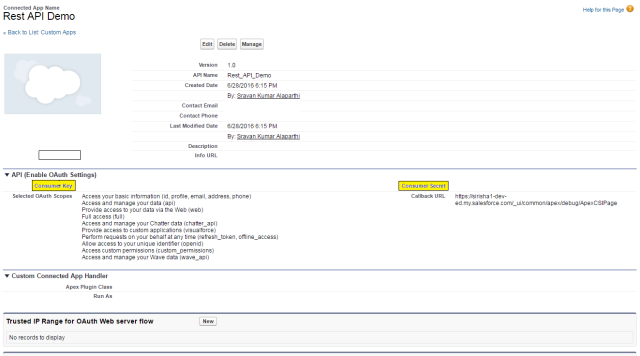
STEP 2a: Connected App Setup for OAuth
- Navigate to Setup, and enter "Apps" in the Quick Find box. Select "Apps" and click "New" to commence the creation of a connected app.
- Provide a name for your application.
- Enter contact email details and any other pertinent information for your application.
- Enable OAuth Settings.
- Specify a Callback URL, which is the URL the user's browser redirects to post-successful authentication. Ensure this URL utilizes secure HTTP (HTTPS) or a custom URI scheme, especially if it's used for passing an access token in some OAuth flows.
- Add all relevant OAuth scopes to "Selected OAuth Scopes." These scopes dictate the permissions granted by the user running the connected app.
- Click "Save." The Consumer Key (Client_ID) is generated and displayed, while the Consumer Secret is created (click the link to reveal it).
STEP 2b: Generating Salesforce Session ID for Secure Resource Access
To obtain the Session ID, essential for accessing secured resources, we will employ the straightforward Username-Password OAuth Authentication Flow.
Required Parameters:
- Consumer Key and Consumer Secret from the connected app established earlier.
- Salesforce username and password (where the password should be the concatenation of the actual password and the security token).
We'll initiate the process by sending a request to the Salesforce endpoint: https://login.salesforce.com/services/oauth2/token and pass the above parameters as shown below.
public static String GetAccessToken(){
   try{
   HttpURLConnection connection = null;
    URL url= new URL("https://login.salesforce.com/services/oauth2/token");
    //Respective parameters are being fetched here from Credentials class
    String urlParameters = "grant_type=password&client_id="+Credentials.client_id+"&client_secret="+Credentials.client_secret+"&username="+Credentials.username+"&password="+Credentials.password;
    connection = (HttpURLConnection) url.openConnection();
    connection.setRequestMethod("POST");
    connection.setRequestProperty("accept", "application/json");
      connection.setRequestProperty("Content-Length","" + Integer.toString(urlParameters.getBytes().length));
      connection.setRequestProperty("Content-Type", "application/x-www-form-urlencoded");
      connection.setRequestProperty("Content-Language", "en-US");
      connection.setUseCaches(false);
      connection.setDoInput(true);
      connection.setDoOutput(true);
      OutputStream os = connection.getOutputStream();
      BufferedWriter writer = new BufferedWriter(new OutputStreamWriter(os, "UTF-8"));
      writer.write(urlParameters);
      writer.flush();
      writer.close();
      os.close();
      // Buffer the result into a string
      InputStream is = connection.getInputStream();
      BufferedReader rd = new BufferedReader(new InputStreamReader(is));
      String line;
      StringBuffer response = new StringBuffer();
      while ((line = rd.readLine()) != null) {
       response.append(line);
       response.append('\r');
      }
      rd.close();
      System.out.println(response.toString());
    //Read the JSON response and extract access_token
      JSONObject obj = new JSONObject(response.toString());
      String access_token = obj.getString("access_token");

      if (connection != null)
          connection.disconnect();
      return(access_token);
  } catch(Exception e)
   {
   e.printStackTrace();
   return null;
   }
  }
}
|
STEP 2c: Access the Endpoint using the Session ID
public static void main(String[] args) throws Exception {
   HttpURLConnection connection = null;
   URL url= new URL("https://sirisha1-dev-ed.my.salesforce.com/services/apexrest/Account/00128000009kGlH");
    connection = (HttpURLConnection) url.openConnection();
    String SessionId= GetAccessToken();
    if (SessionId != null)
       connection.setRequestProperty("Authorization", "OAuth "+ SessionId);
      connection.setRequestProperty("accept", "application/json");
      connection.setRequestMethod("GET");
      InputStream is = connection.getInputStream();
      BufferedReader rd = new BufferedReader(new InputStreamReader(is));
      String line;
      StringBuffer response = new StringBuffer();
      while ((line = rd.readLine()) != null) {
       response.append(line);
       response.append('\r');
      }
      rd.close();
      System.out.print(response.toString());

 }
|
The response we will be receiving from the above code will be:
{
 "attributes": {
  "type": "Account",
  "url": "/services/data/v37.0/sobjects/Account/00128000009kGlHAAU"
 },
 "Id": "00128000009kGlHAAU",
 "Name": "Grand Hotels & Resorts Ltd",
 "Phone": "(312) 596-1000",
 "Website": "www.grandhotels.com"
}
|